Select Fire™
A unified three-step workflow for simulating and remediating identity access changes — from impact analysis to script generation in a single guided modal.
Requires role: Operator (viewing and simulation); Admin (script generation)
Related: Over-Permission Analytics, Stale Identity Detection, Risk Posture Dashboard, Multi-Agent Intelligence, Graph Explorer, Detection Alerts, Critical Junctions
Overview
Select Fire™ is a multi-step action modal that unifies blast radius simulation and remediation script generation into a single guided experience. Select Fire focuses on access revocation — modeling what happens when you remove permissions, group memberships, or other access relationships. For modeling new access grants, see Predictive Provisioning (coming soon).
Instead of running a simulation in one panel and then separately generating a remediation script, operators work through a single flow:
- Preview — Define the change: either review an auto-loaded remediation plan from a finding, or manually search for a subject and target
- Simulate — Run a what-if simulation and review the blast radius in a full-page overlay with an interactive graph and detail flyout
- Decision — Choose an execution mode, review the AI-generated remediation script, and copy or download it for manual execution
Select Fire™ supports a "gradient of control" philosophy. Safe Mode (available now) puts the operator in full control by generating a script for manual review and execution. Semi-Auto and Full-Auto modes, which will execute changes directly through the Identity Bridge, are coming in a future release. The Operational Safety Metric™ (OSM) provides a deterministic safety assessment for each simulation and recommends the appropriate execution mode.
Prerequisites
- Role: Operator or Admin to open the modal and run simulations. Admin is additionally required to generate remediation scripts in Safe Mode.
- Data: At least one successful identity sync must have completed so that identities are available to search.
- Simulation service: The backend must be reachable (the same server that handles graph queries also handles simulations).
NOTE
Viewers cannot see the Select Fire toolbar button, right-click menu entries, or the Lightning buttons on finding rows. These controls are hidden for accounts with the Viewer role.
Opening Select Fire
There are five ways to open the Select Fire modal, depending on where you are in the platform.
From the Graph Explorer toolbar
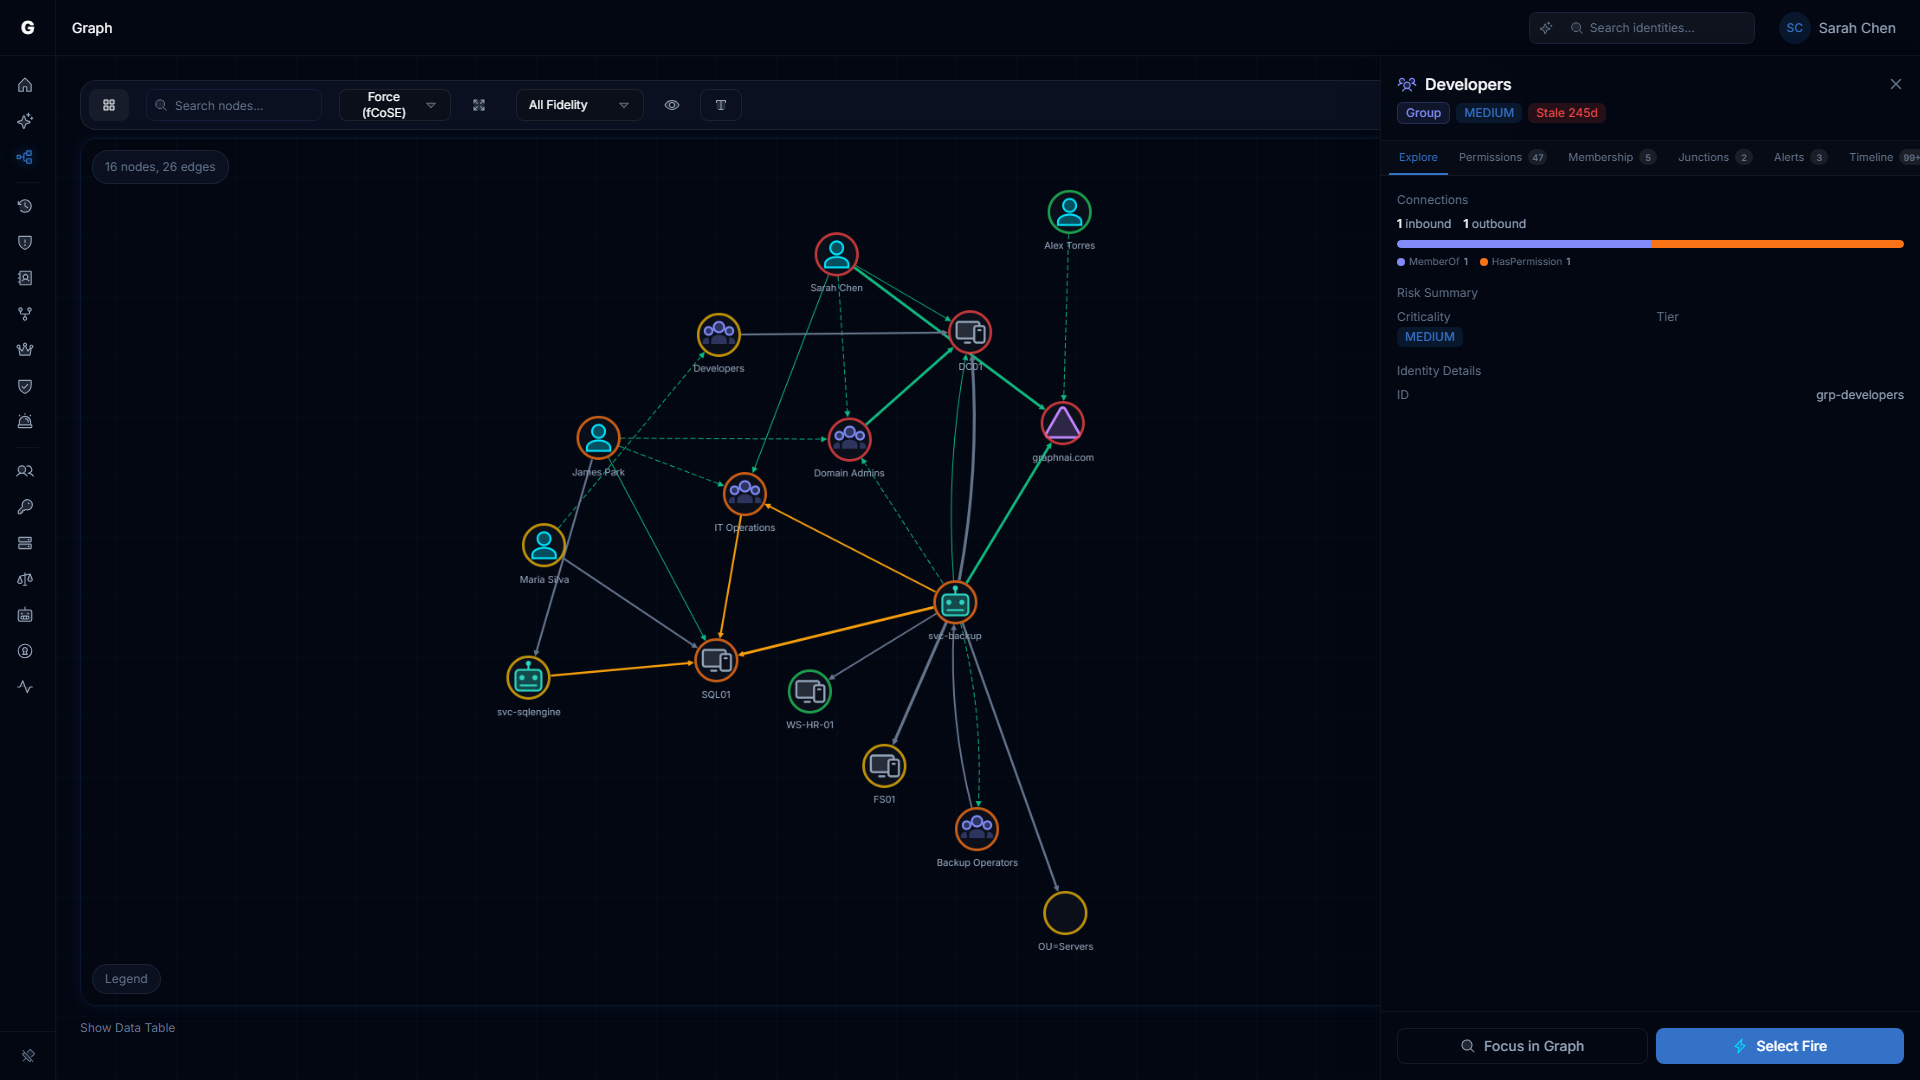
Click the Lightning bolt button in the Graph Explorer toolbar. The modal opens in Manual mode with no pre-populated fields. Use this entry point when you want to explore a hypothetical change that is not tied to a specific finding.
From a node right-click
Right-click any identity node in the Graph Explorer and select Select Fire from the context menu. The modal opens in Manual mode with the clicked identity pre-populated as the subject. You then select the target to revoke access from.
From an edge right-click
Right-click any permission edge in the Graph Explorer and select Select Fire. The modal opens with the source node as the subject, the destination node as the target, and the operation set to Revoke Access. This is the fastest path to simulate revoking a specific permission you can see in the graph.
From a finding row (Lightning button)
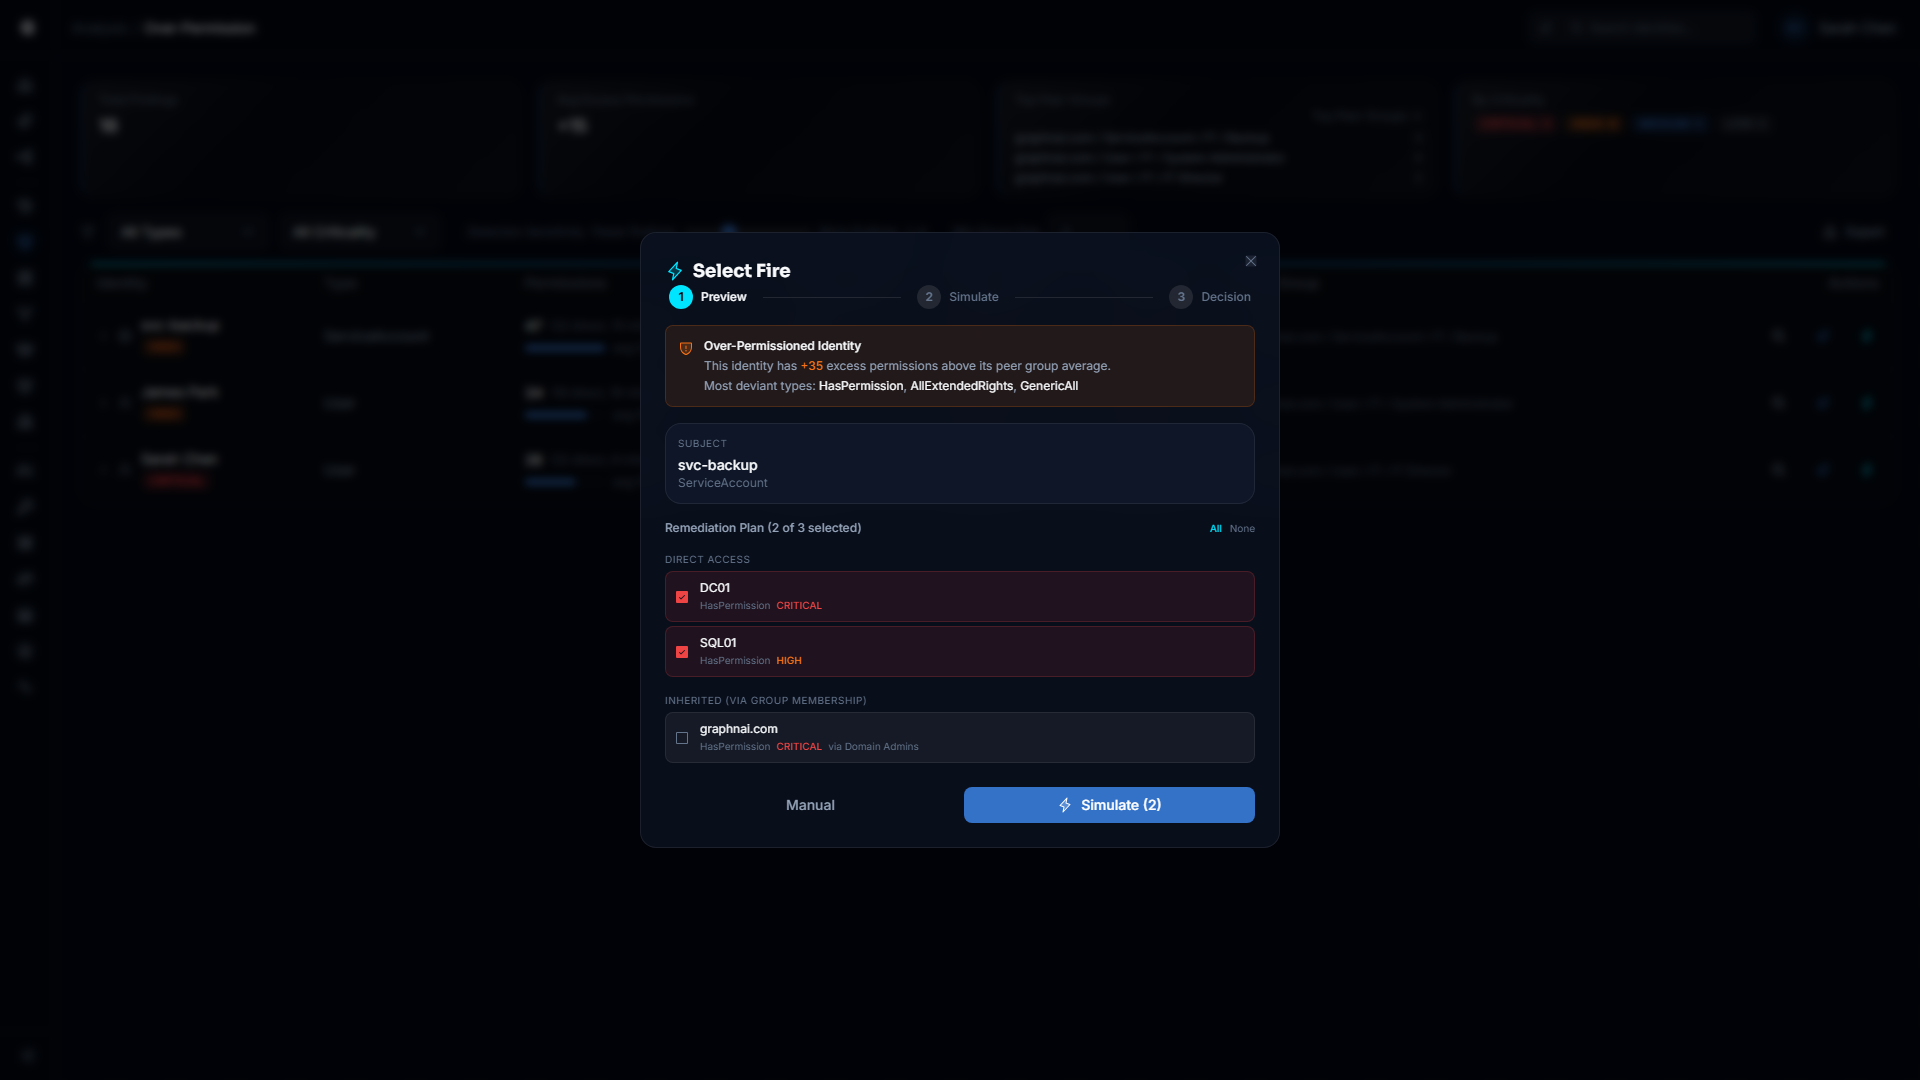
Finding rows across the platform include a Lightning bolt button that opens Select Fire with context already loaded. When opened from a finding, Select Fire enters Finding Plan mode — a specialized Preview experience that auto-loads the identity's access relationships and presents them as a selectable checklist (see Step 1: Preview — Finding Plan mode).
| Page | Pre-populated subject | Default operation | Finding hint |
|---|---|---|---|
| Risk Posture Dashboard — Top Findings | The flagged identity | Revoke Access | General risk finding |
| Over-Permission Analytics | The over-permissioned identity | Revoke Access | Excess permission count and deviant types |
| Stale Identity Detection | The stale identity | Revoke Access | Days inactive |
| Critical Junctions | The junction node | Revoke Access | Junction score |
| ITDR Detection Alerts | The alerted identity | Revoke Access | Rule name and alert severity |
From the Graphne conversational agent
When the Graphne AI agent identifies a misconfiguration during conversation (e.g., a user in Exchange Trusted Subsystem who should not be, a stale account with Domain Admins membership), it can offer one-click remediation. The agent's response includes a Launch Select Fire button with subject, target, and finding context already pre-filled.
Clicking the button opens the ActionModal with context loaded — you still go through the full Preview, Simulate, and Decision flow. This entry point combines AI analysis with the Select Fire workflow: the agent identifies the issue, and Select Fire handles the remediation.
Step 1: Preview
The Preview step is where you define what change you want to model. It operates in one of two modes depending on how you opened the modal.
Finding Plan mode
When Select Fire is opened from a finding row (any analysis page or dashboard), it enters Finding Plan mode. This mode automatically loads the subject identity's access relationships from the backend and presents them as a selectable checklist, organized into two groups:
- Direct Access — Permissions the identity holds directly (e.g., explicit group memberships, direct ACL grants)
- Inherited (via group membership) — Permissions the identity holds transitively through nested group membership chains
Auto-selection. CRITICAL and HIGH criticality targets in the Direct Access group are automatically selected when the plan loads. This means the highest-risk access is pre-checked, but you can adjust the selection before simulating.
Checklist controls. Each row shows the target display name, edge type (e.g., MemberOf, HasPermission), criticality level, and inheritance path (for inherited targets). Click any row to toggle its selection. Use the All and None links above the list to bulk-select or deselect.
Multi-target simulation. The Finding Plan mode supports simulating the removal of multiple targets in a single operation. The Simulate button shows the count of selected targets (e.g., "Simulate (4)") and submits all selected targets together. This produces a combined blast radius that reflects the cumulative impact of removing all selected access at once.
Subject information. A read-only card at the top shows the subject identity's display name and type. The subject is determined by the finding row you clicked and cannot be changed in Finding Plan mode.
Finding hint card. A colored hint card appears below the subject, providing context about why the identity was flagged:
| Finding source | Hint card content |
|---|---|
| Over-Permission | Excess permission count above peer group average; most deviant permission types |
| Stale Account | Number of days the identity has been inactive |
| Critical Junction | Junction score; note that reducing permissions shrinks lateral movement paths |
| Detection Alert | Detection rule name and alert severity level |
| Dashboard | General risk finding note |
Fallback to Manual. If the backend cannot load access relationships (e.g., network error, no relationships found), a prompt appears with a Switch to Manual button. You can also click the Manual button at the bottom of the plan view at any time to switch to the Manual Preview.
Manual Preview
When Select Fire is opened from the toolbar, a node right-click, or an edge right-click — or when you switch from Finding Plan mode — it uses Manual Preview. This is the search-based subject/target selection experience.
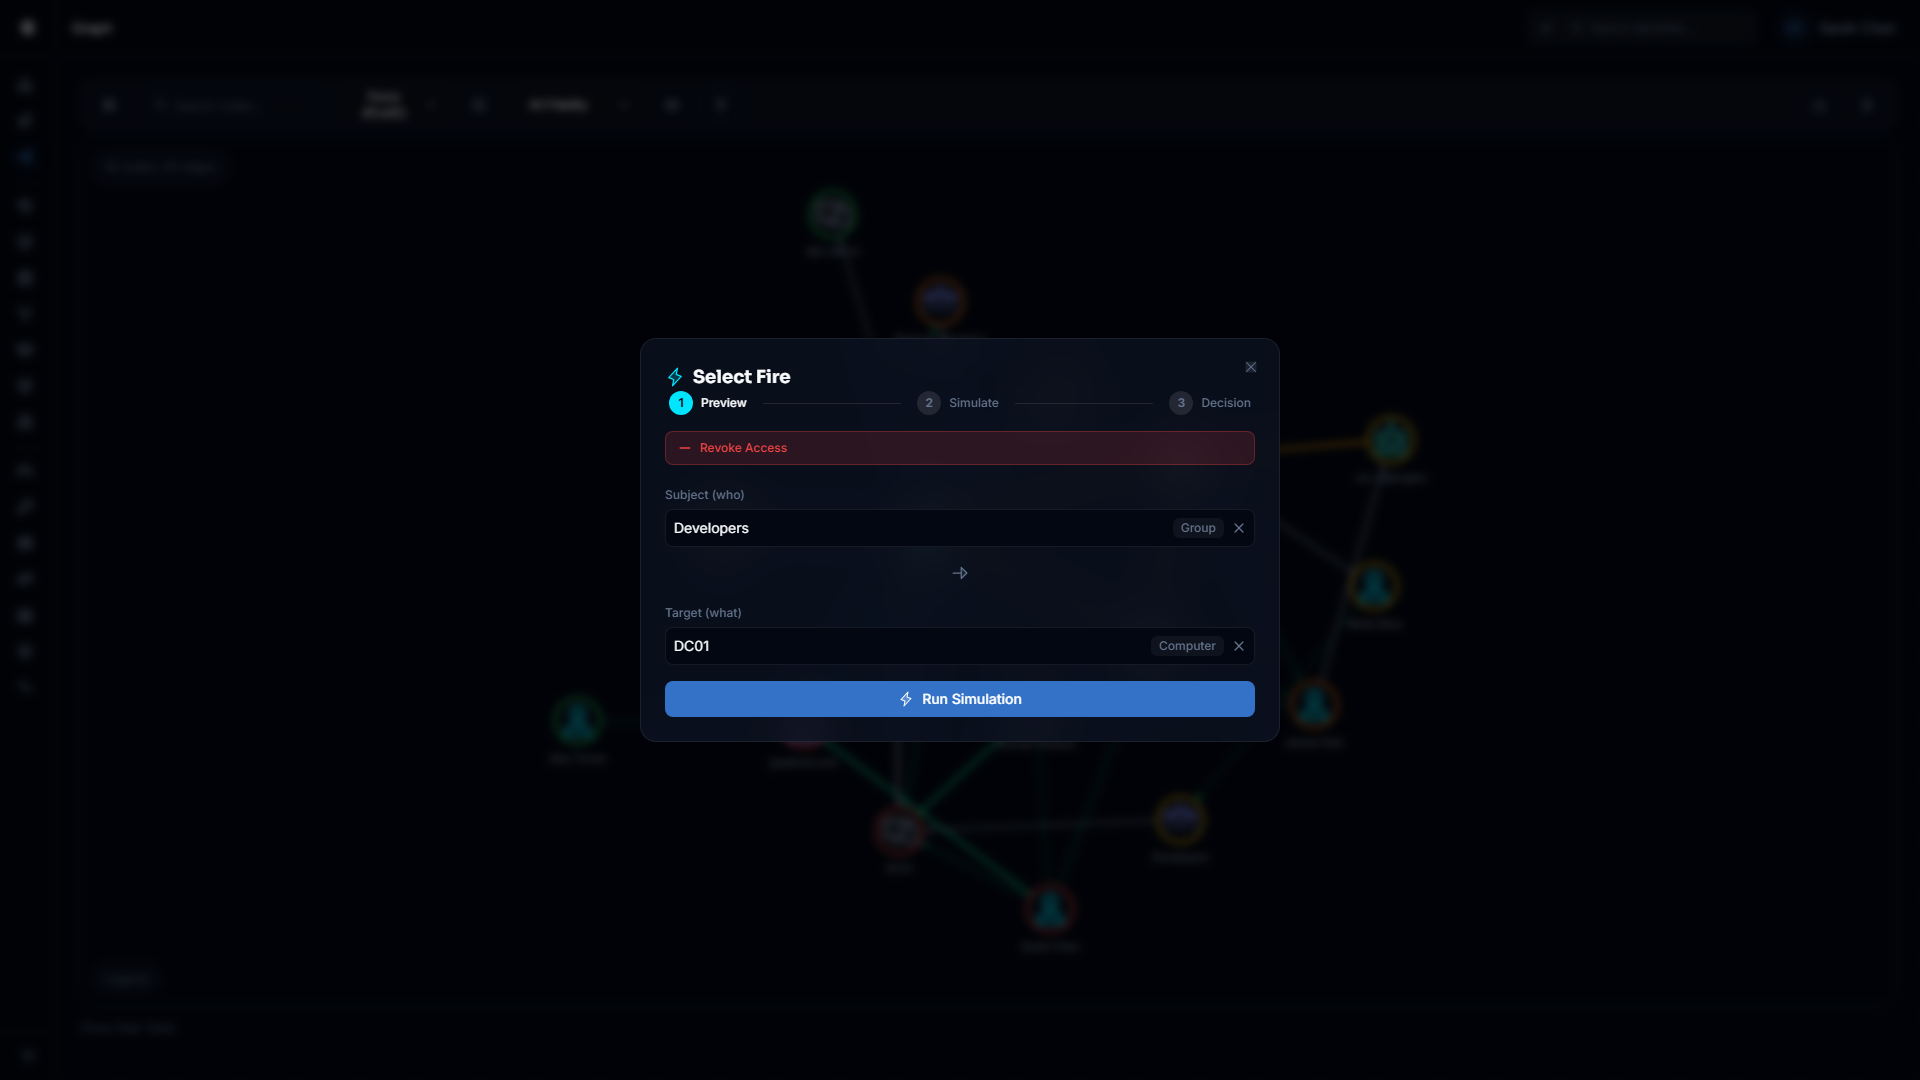
Operation mode. Select Fire operates in Revoke Access mode, shown as a red label at the top of the modal. All simulations model the impact of removing access from the subject to the target.
For modeling new access grants, see Predictive Provisioning (coming soon).
Selecting the subject and target. Use the Subject (who) search field to find the identity whose access you want to revoke. Type part of the display name and select from the results. Use the Target (what) search field to find the resource or identity that the subject should lose access to.
Both fields must be filled in before you can run the simulation. If you opened the modal from a node right-click, the subject is pre-filled and you only need to provide the target. If you opened from an edge right-click, both subject and target are pre-filled.
Finding hint card. If you switched to Manual from a Finding Plan that had context attached, the finding hint card remains visible below the search fields.
Running the simulation. Click Run Simulation when both subject and target are filled in. The system runs a what-if analysis using the Differential State Engine™ and advances to the Simulate step.
Step 2: Simulate
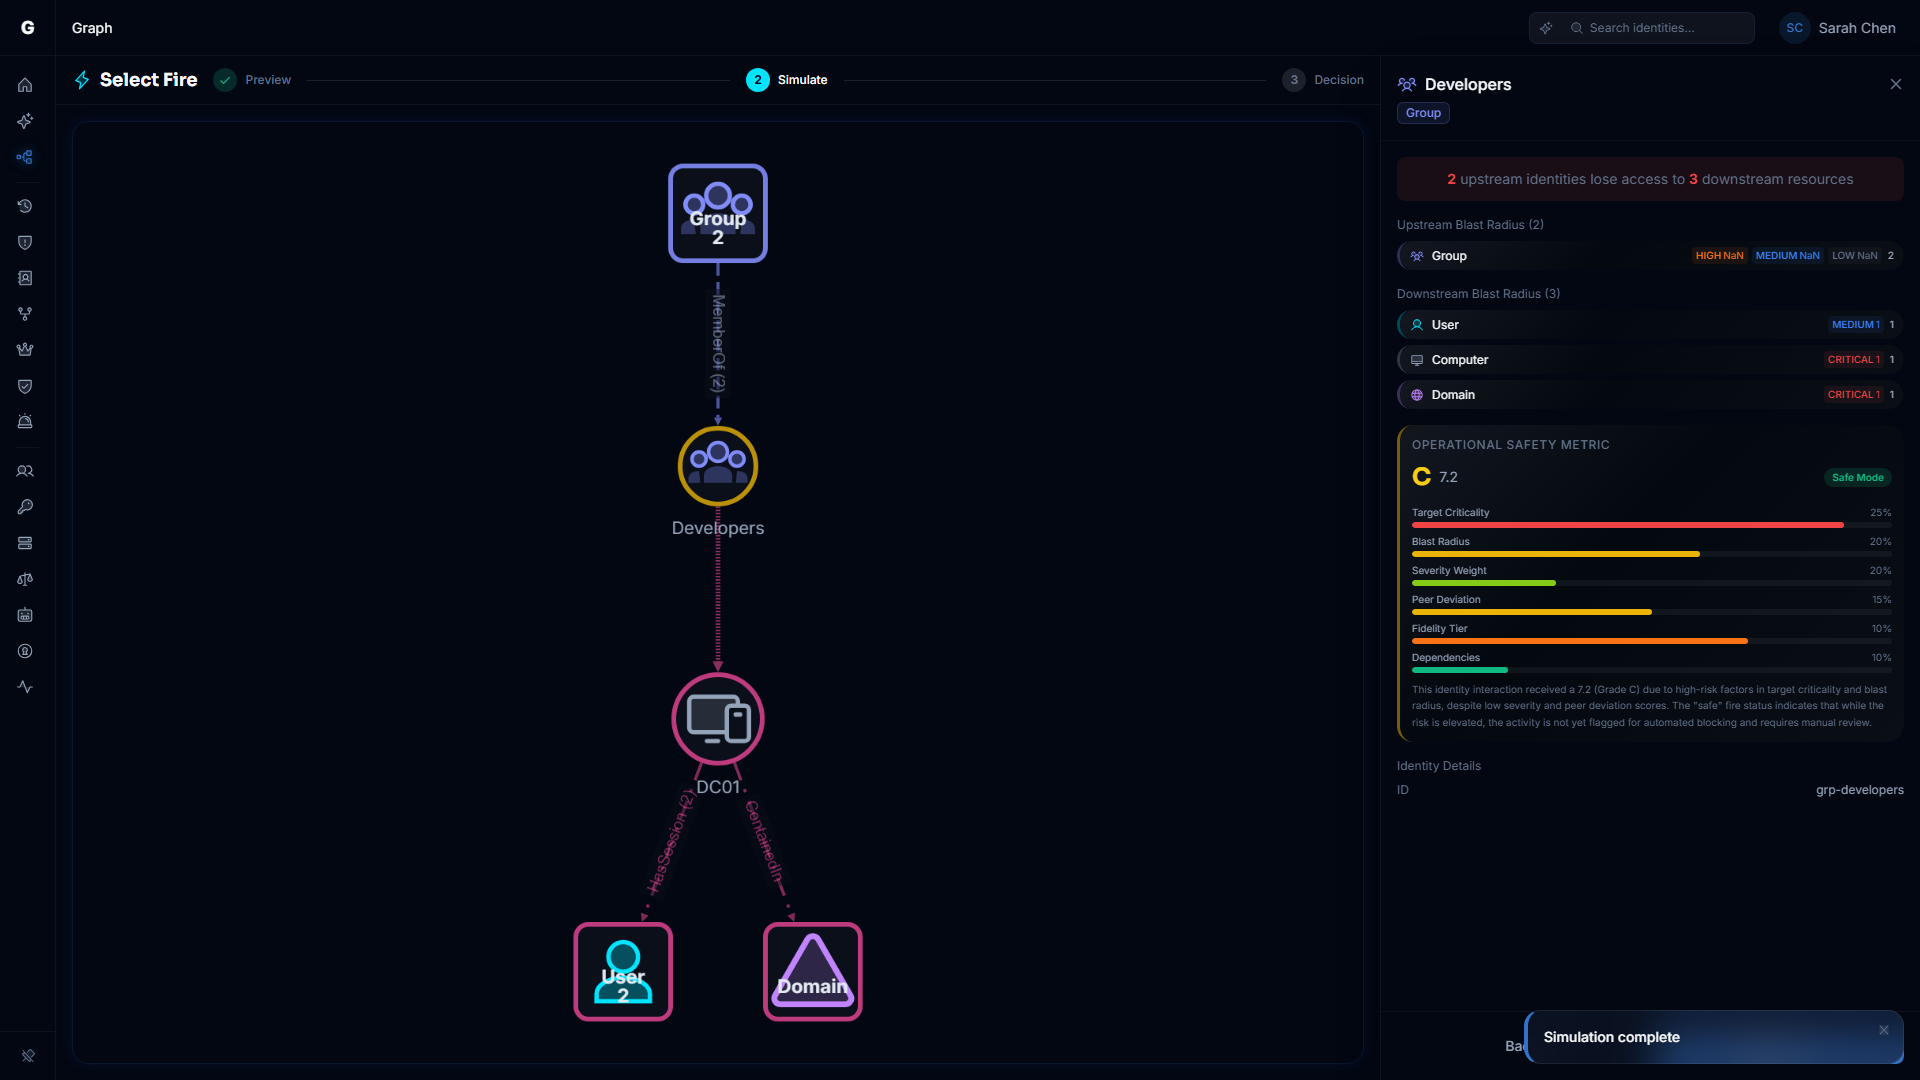
The Simulate step shows the blast radius of the proposed change in a full-page overlay that replaces the main content area. The overlay contains two panels: an interactive graph on the left and a detail flyout on the right.
The overlay sits below the top navigation bar. A header bar spans the full width with the Select Fire lightning icon, title, and a step indicator showing your progress through the three-step flow. Press Escape to close the overlay and return to the page you were on.
Simulation graph (left panel)
The left panel renders an interactive SimulationGraph that visualizes the subject, targets, and their surrounding access topology with the proposed changes applied.
Multi-target support. When multiple targets were selected in the Finding Plan, each target appears as a distinct node in the graph. The graph shows the combined effect of removing all selected access relationships simultaneously.
Aggregate drill-down. Click any aggregate node or edge segment in the simulation graph to open a data table below the graph. The table shows the individual identities or resources represented by that aggregate, with type and criticality information. Click any row in the table to navigate to that identity in the Graph Explorer (this closes the Select Fire overlay).
Node styling:
- Cyan-outlined node — The subject identity
- Target nodes — The targets being revoked, each with its own type-based icon and color
- Dimmed nodes — Context nodes outside the immediate blast radius
Detail flyout (right panel)
The right panel is a FindingDetailFlyout that presents the simulation results in a structured, scrollable format.
Impact summary. At the top, a highlighted banner summarizes the blast radius in plain language: how many upstream identities lose access to how many downstream resources.
Upstream Blast Radius. A section listing identity types that can reach the subject through inbound access paths. For each type, a row shows the total count and a criticality breakdown (CRITICAL, HIGH, MEDIUM, LOW). This represents identities whose attack paths through the subject would be disrupted by the proposed change.
Edges Removed. A section listing the specific access relationships being removed. Each row shows the edge type (e.g., MemberOf, HasPermission), an arrow, the target identity type icon, and the target display name. If the edge carries specific permissions, a line below shows the permission count or name.
Downstream Blast Radius. A section listing resource types that the subject would lose access to after the revocation. Same format as the upstream section: type rows with criticality breakdowns.
Operational Safety Metric™. When the simulation response includes an OSM assessment, an expandable card displays the safety grade (A through F), the numeric score, and the recommended Select Fire execution mode. The card can be expanded to show individual factor names with visual progress bars. The OSM provides a deterministic safety assessment based on factors including blast radius scope, criticality concentration, reversibility, and other environmental signals.
NOTE
The OSM factors and their relative contribution to the grade are shown in the expanded view. Exact scoring formulas are not exposed in the interface.
Simulation expiry. Simulations have a time-to-live (set by your administrator, default 60 minutes). If the simulation expires while the overlay is open, an expiry message appears with a Re-simulate button that returns you to the Preview step with all inputs preserved.
Navigation. The flyout footer contains two buttons:
- Back — Returns to the Preview step so you can adjust targets or switch modes
- Decision — Advances to the Decision step to generate a remediation script
Step 3: Decision
The Decision step is where you choose how to act on the simulated change. It returns to the centered dialog format used by the Preview step.
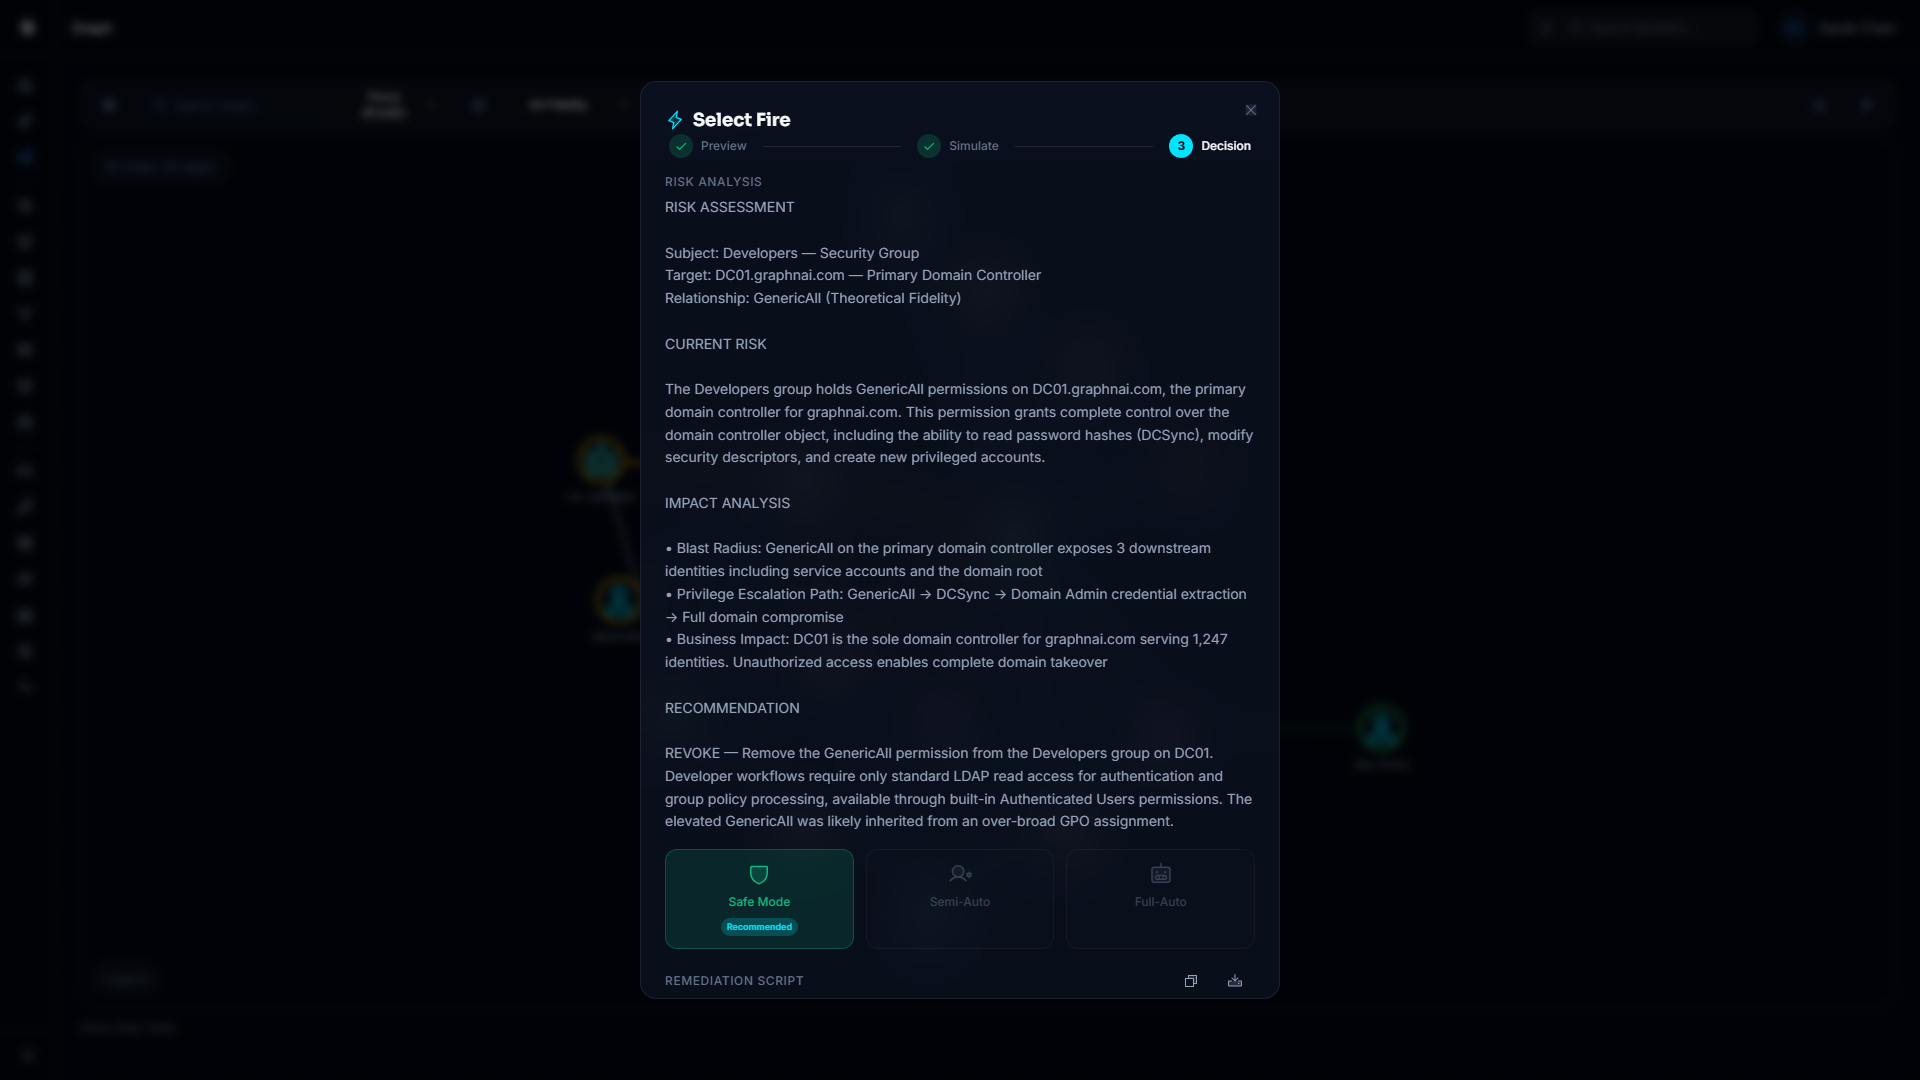
Auto-generated risk analysis
When an Admin user enters the Decision step, remediation generation begins automatically — there is no need to click a button. An "Analyzing risk..." indicator appears while the AI processes the simulation context.
The risk analysis streams in with a typewriter effect at the top of the dialog. It explains what the change accomplishes, what risks it addresses, the affected scope, and anything to verify before running the script. The analysis incorporates multi-target context when multiple access relationships were selected in the Finding Plan.
NOTE
Operators who are not Admins see the Decision step but cannot trigger remediation generation. A Generate Remediation Script button appears as a fallback, but it is disabled with a tooltip reading "Requires Admin role."
Execution mode cards
Three mode cards represent the gradient of control:
| Mode | Status | Description |
|---|---|---|
| Safe Mode | Available | Generate a reviewed remediation script to execute manually |
| Semi-Auto | Coming soon | Authorize each action individually through the Identity Bridge |
| Full-Auto | Coming soon | Execute all actions automatically with Operational Safety Metric™ gating |
Only Safe Mode is active in the current release. Semi-Auto and Full-Auto are shown but disabled; hovering over them displays a tooltip explaining their requirements. Safe Mode is selected by default.
OSM-recommended mode badge. When the simulation includes an OSM result, the mode card that matches the OSM recommendation displays a Recommended badge (a cyan pill label). This gives you a quick visual indicator of what the safety assessment considers appropriate for this change.
Safe Mode: remediation script
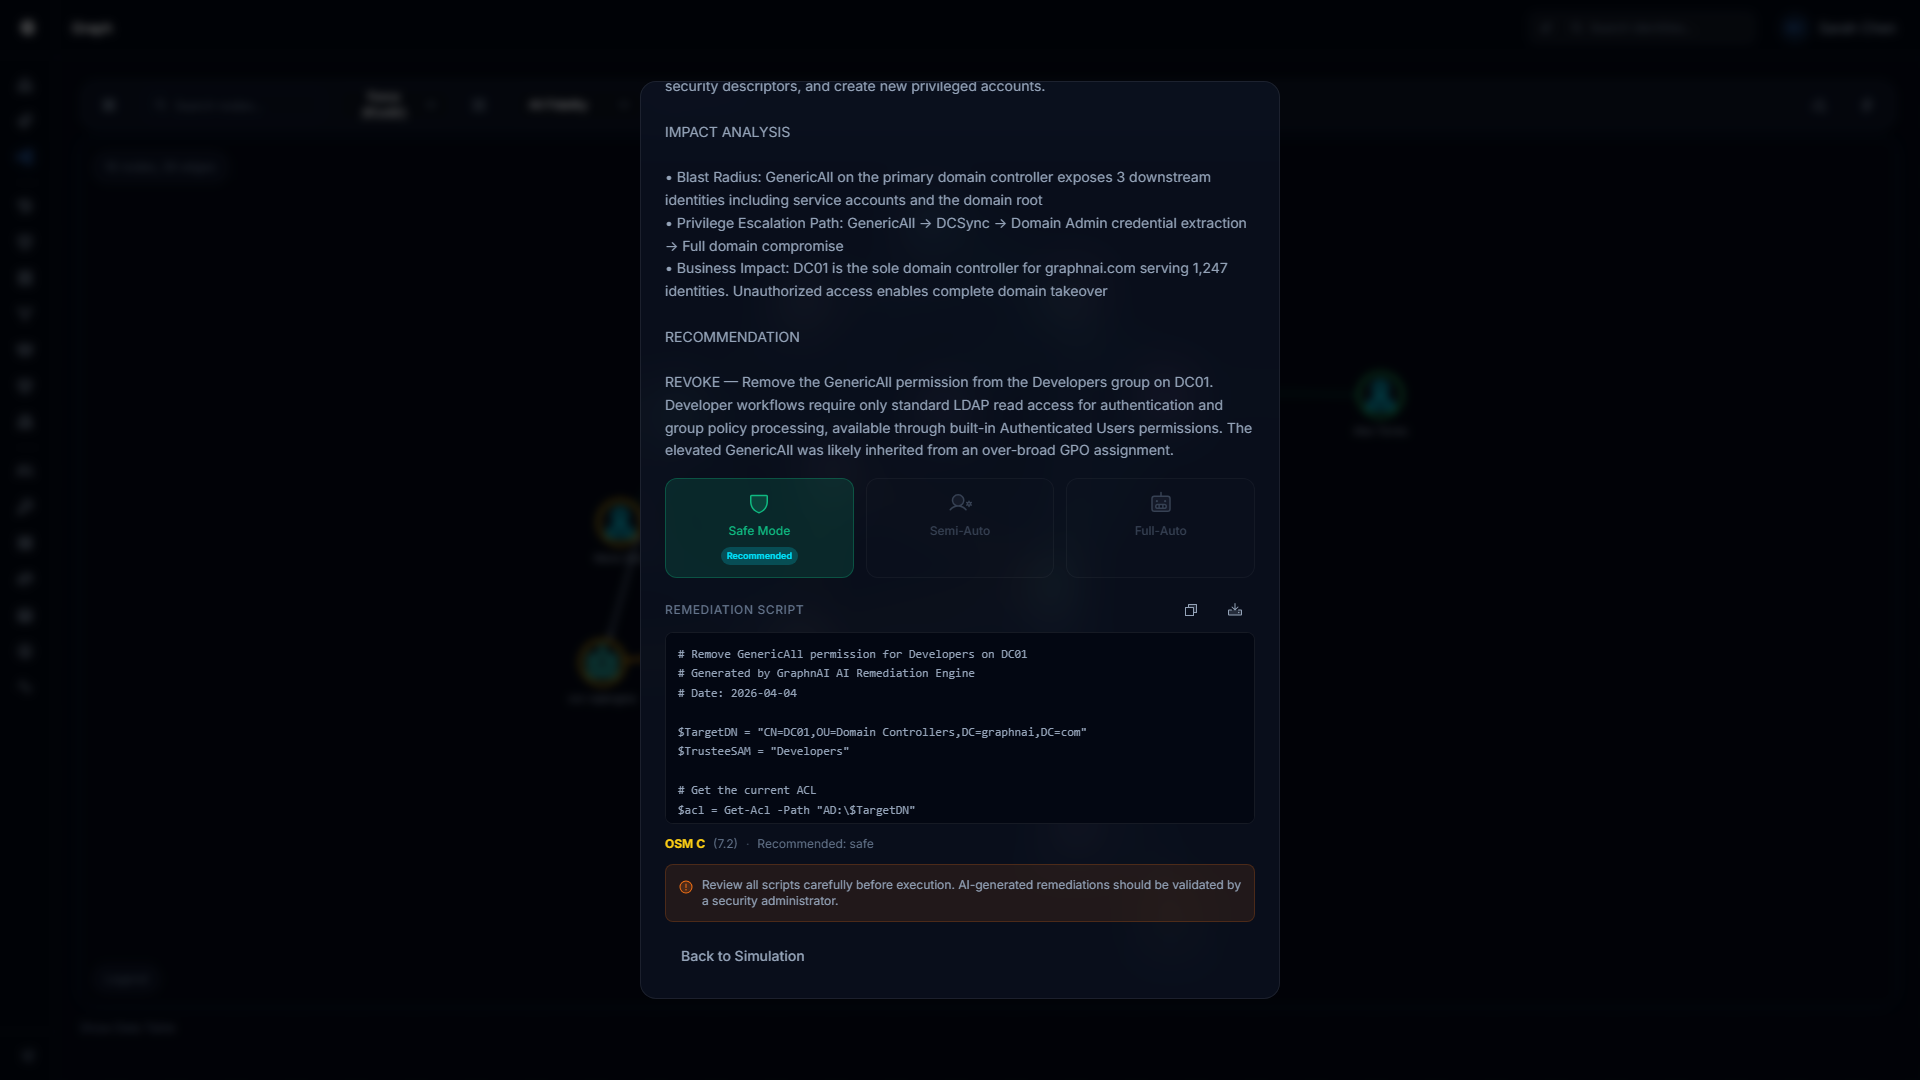
With Safe Mode selected, the remediation script appears automatically below the risk analysis once generation completes.
The script is displayed in a scrollable code block. Two buttons appear in the header:
- Copy — Copies the script to your clipboard. The button briefly shows a checkmark to confirm.
- Download — Saves the script as a file (
remediation-<timestamp>.ps1for PowerShell or.shfor shell).
A warning banner below the script reminds you to review all scripts carefully before execution. AI-generated remediations should be validated by a security administrator before they are run against production systems.
Retry fallback. If the auto-generation fails, an error message appears and a Generate Remediation Script button becomes visible so you can retry. This button also appears if the auto-trigger did not fire (e.g., due to a timing edge case). Under normal operation, you should not need to click it.
OSM summary footer
After remediation generation completes, a compact footer line displays the OSM grade, numeric score, and recommended execution mode. This serves as a quick reference without needing to scroll back to the Simulate step.
Returning to the simulation
Click Back to Simulation at any point in the Decision step to return to the Simulate step and review the blast radius again.
Working from Findings
Select Fire integrates with five analysis surfaces that produce finding rows. Opening the modal from a finding row enters Finding Plan mode, which automatically loads the identity's access relationships and presents them as a selectable checklist with auto-selected CRITICAL/HIGH targets.
Over-Permission findings
On the Over-Permission Analytics page, each finding row includes a Lightning button. Clicking it opens Select Fire with:
- Subject set to the over-permissioned identity
- Finding Plan mode active with access relationships auto-loaded
- Finding hint card showing how many excess permissions the identity holds above the peer group average, and which permission types deviate the most
- CRITICAL and HIGH direct access targets auto-selected
Stale identity findings
On the Stale Identity Detection page, the Lightning button opens Select Fire with:
- Subject set to the stale identity
- Finding Plan mode active
- Finding hint card showing the number of days the identity has been inactive
The typical workflow is to review the auto-loaded access checklist, select the privileged groups or resources the stale account still has access to, simulate the combined revocation, then generate a script to remove that access or disable the account.
Critical junction findings
On the Critical Junctions page (within the Graph Explorer), the Lightning button opens Select Fire with:
- Subject set to the junction node
- Finding Plan mode active
- Finding hint card showing the junction score
Since junction nodes connect low-privilege to high-privilege zones, the upstream blast radius in the Simulate step is especially useful here: it shows you exactly which identities' lateral movement paths would be disrupted.
Detection alert findings
On the ITDR Detection Alerts page, the Lightning button opens Select Fire with:
- Subject set to the identity that triggered the alert
- Finding Plan mode active
- Finding hint card showing the detection rule name and alert severity
This entry point lets you immediately model the impact of revoking access from an identity involved in a detected threat (e.g., brute force, Kerberoasting, DCSync).
Dashboard top findings
On the Risk Posture Dashboard, each row in the Top Findings table includes a Lightning button. Clicking it opens Select Fire with:
- Subject set to the flagged identity
- Finding Plan mode active
- A general risk finding hint card
Role Requirements Summary
| Action | Required role |
|---|---|
| Open the Select Fire modal | Operator or Admin |
| Run a simulation (Preview to Simulate) | Operator or Admin |
| View blast radius results and OSM assessment | Operator or Admin |
| Generate a remediation script (Safe Mode) | Admin only |
| Copy or download a generated script | Admin only |
Viewer-role accounts do not see the Lightning bolt toolbar button, node/edge right-click menu entries, or the Lightning buttons on finding rows.
Operational Safety Metric™ (OSM)
The Operational Safety Metric™ is a deterministic safety assessment that accompanies every simulation. It evaluates the proposed change across multiple factors and produces:
- Grade — A letter grade from A (safest) to F (highest risk)
- Score — A numeric score
- Recommended mode — The Select Fire execution mode the OSM considers appropriate (Safe, Semi-Auto, or Full-Auto)
- Factors — Named risk dimensions with individual contribution bars
The OSM appears in two places within Select Fire:
- Simulate step — An expandable card in the detail flyout showing the full grade, score, factors, and explanation
- Decision step — A Recommended badge on the appropriate mode card, plus a compact summary footer after remediation generation
The OSM factors are evaluated based on signals such as blast radius scope, criticality concentration, reversibility characteristics, and environmental context. Each factor is shown by name with a visual progress bar indicating its contribution. The exact weight values and scoring formulas are internal to the assessment engine.
Troubleshooting
Finding Plan shows "Failed to load access relationships"
The Finding Plan mode fetches remediation targets from the backend. If this call fails, an error message appears with a Switch to Manual button. Check that the backend server is reachable at /ready and that the identity has been fully synced. You can always proceed using Manual mode.
"Run Simulation" button is disabled (Manual mode)
The button requires both the Subject and Target fields to be filled in. If either field is empty, the button remains disabled. If you opened the modal from a node right-click, only the subject is pre-filled — you still need to select a target.
"Simulate" button is disabled (Finding Plan mode)
The button requires at least one target to be selected in the checklist. Check that you have toggled on at least one row. If no access relationships were loaded, switch to Manual mode.
Simulation returns immediately with no results
Check that the subject and target are distinct identities. Simulating a change between identical nodes is not meaningful and may return empty results. If the issue persists, check that the backend server is reachable at /ready.
"Simulation Expired" appears on the Simulate step
Simulations are stored temporarily with a time-to-live (default 60 minutes). If you left the overlay open and the simulation expired, click Re-simulate to return to the Preview step and re-run with the same parameters. No data is lost — the Preview step inputs are preserved.
Remediation generation does not start automatically
Auto-generation requires the Admin role. If you are logged in as an Operator, the generation does not trigger and a disabled Generate Remediation Script button appears instead. Contact your platform administrator to have your role elevated, or ask an administrator to generate the script on your behalf.
If you are an Admin and generation did not start, it may be a timing edge case. Click the Generate Remediation Script button that appears as a fallback.
Script generation fails with an error
If the script generation step returns an error message, check that:
- An AI provider is configured (OpenAI, Gemini, or a local model). Script generation requires a working AI backend.
- The server logs contain more detail. The UI shows a generic message; full error information is recorded server-side.
- The simulation has not expired between the Simulate and Decision steps. If it has, return to Preview and re-run.
The simulation graph appears empty
The graph loads topology data for the simulation subgraph. If the left panel appears blank:
- The simulation may have taken longer than expected — wait a moment and check if nodes appear.
- The subject identity may not have any reachable relationships in the loaded topology. Try checking the subject in the full Graph Explorer to confirm it has connections.
- If the graph stays blank after 10 seconds, close the overlay, re-open Select Fire, and re-run the simulation.
OSM shows "Unavailable"
The OSM requires sufficient data to compute a meaningful assessment. If the grade shows a dash and the label reads "Unavailable," the simulation did not return enough context for the safety engine to score. This can happen with very small blast radii or edge cases in the topology. The simulation results are still valid — proceed with manual risk judgment.
Lightning buttons are not visible on finding rows
Lightning buttons are only visible to users with Operator or Admin role. If you are logged in as a Viewer, these buttons are hidden. Contact your platform administrator to request a role change.