Stale Identity Detection
Identify dormant accounts that exceed configured inactivity thresholds, prioritized by criticality and security tier.
Requires role: Operator or higher
Related: Identity Inventory, Risk Posture Dashboard, Over-Permission Analytics, Select Fire, Multi-Agent Intelligence, Asset Criticality, Attribute Sync Configuration
NOTE
Stale identity findings are now integrated into the Identity Inventory as the "Stale Identities" filter preset. The Inventory provides the same staleness detection within a unified table that includes risk scoring, permission analysis, and delegation posture. This standalone page remains available for custom threshold configuration and type-specific staleness analysis.
Overview
Enterprise environments accumulate stale accounts over time. Employees leave, service accounts for decommissioned applications remain active, and test machines stay joined to the domain long after their hardware is recycled. These dormant identities represent a security risk: an attacker who compromises a stale account inherits all of its standing permissions while evading detection since no legitimate user is monitoring the account for suspicious activity.
The Stale Identity Detection feature identifies and surfaces identities that have exceeded their inactivity threshold, ranked by criticality so that dormant Tier 0 accounts (Domain Admins, Enterprise Admins) are prioritized over low-privilege stale accounts. Unlike generic "last login" reports, this analysis integrates with GraphnAI's Asset Criticality Engine to ensure high-risk stale accounts appear at the top of your remediation queue.
Prerequisites
- Role: Operator or Admin
- Data sync: At least one bridge must have completed a full sync so that identity nodes exist in the graph
- Criticality evaluation: The background worker should have evaluated asset criticality at least once (this happens automatically after each sync)
Accessing the Stale Identities View
- Log in to GraphnAI Platform with an Operator or Admin account
- Navigate to Analysis > Stale Identities from the left navigation menu
- The table loads automatically with default thresholds applied
You can also arrive at this page from the Risk Posture Dashboard. Clicking the Tier 0 Exposure card navigates here with a ?tier=0 URL filter pre-applied, showing only stale identities at that specific tier. A badge appears above the filters indicating the tier constraint, and you can dismiss it to see all results.
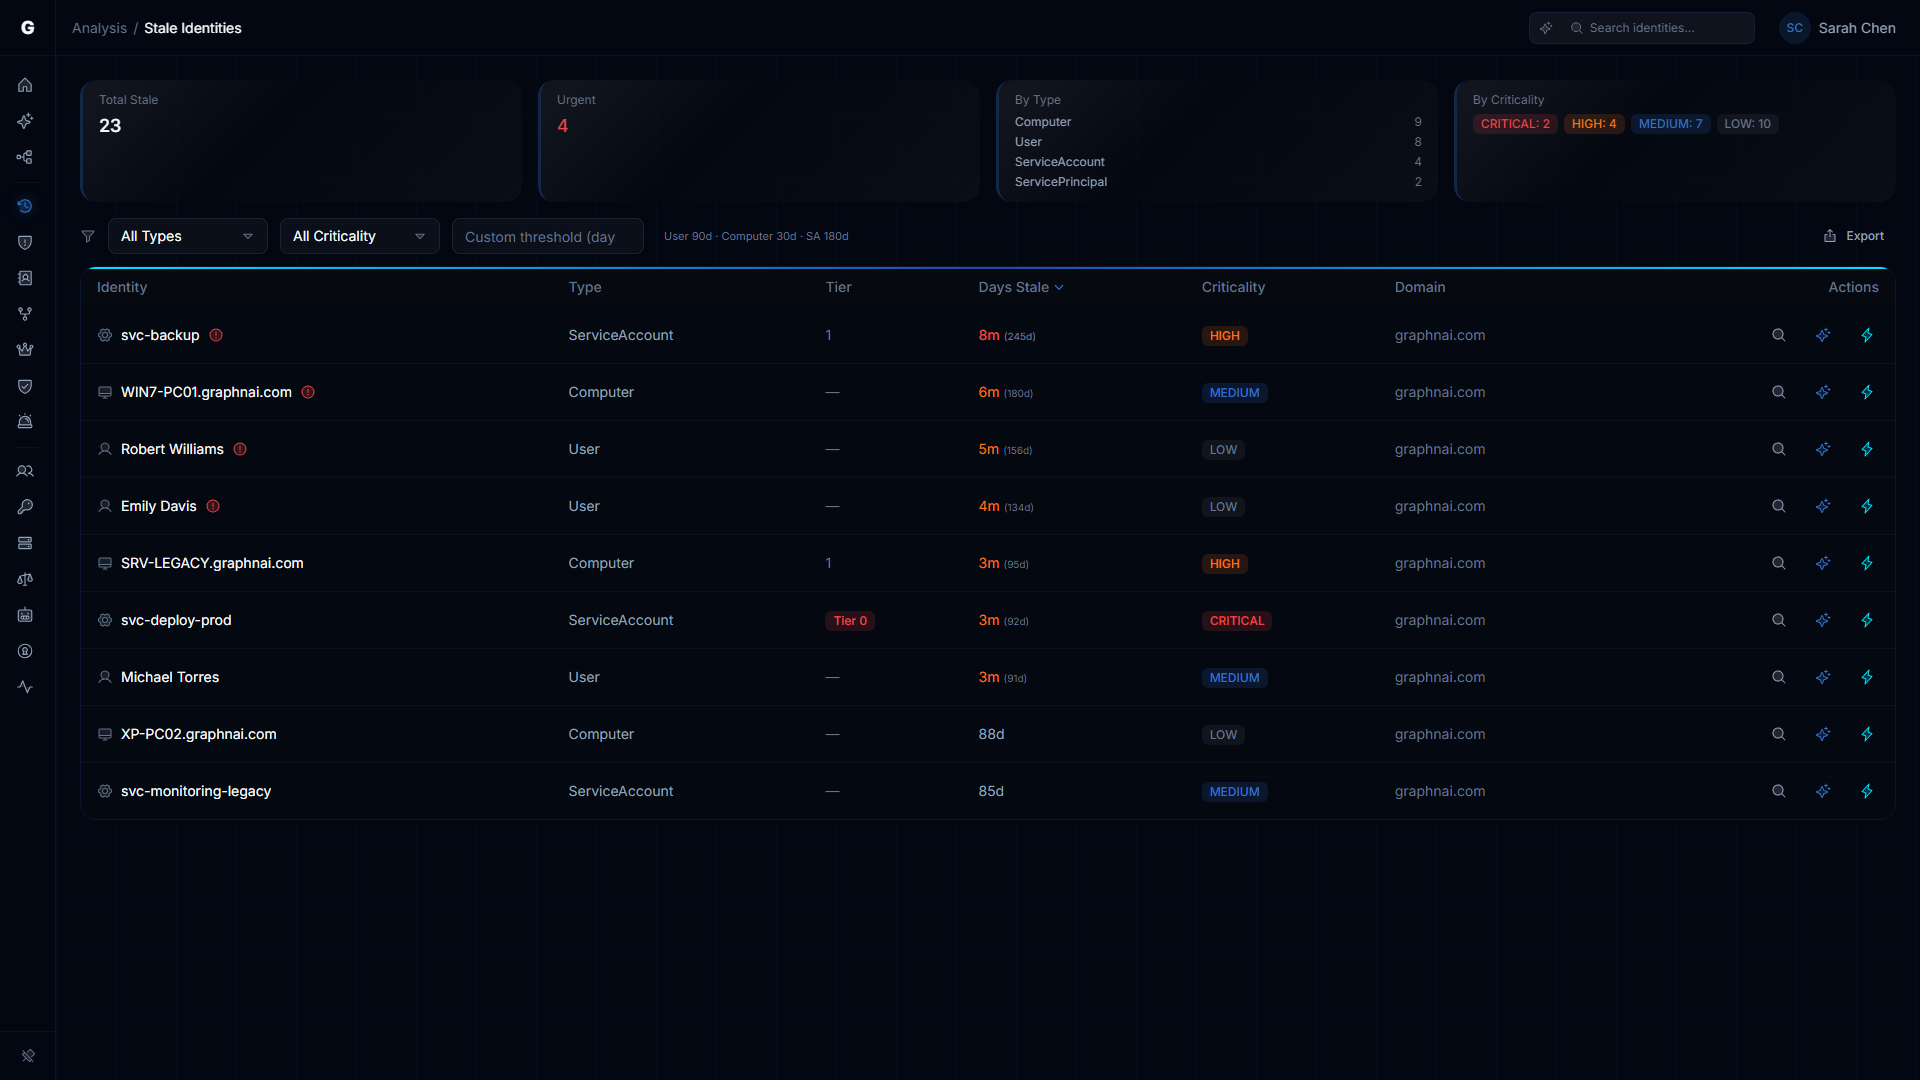
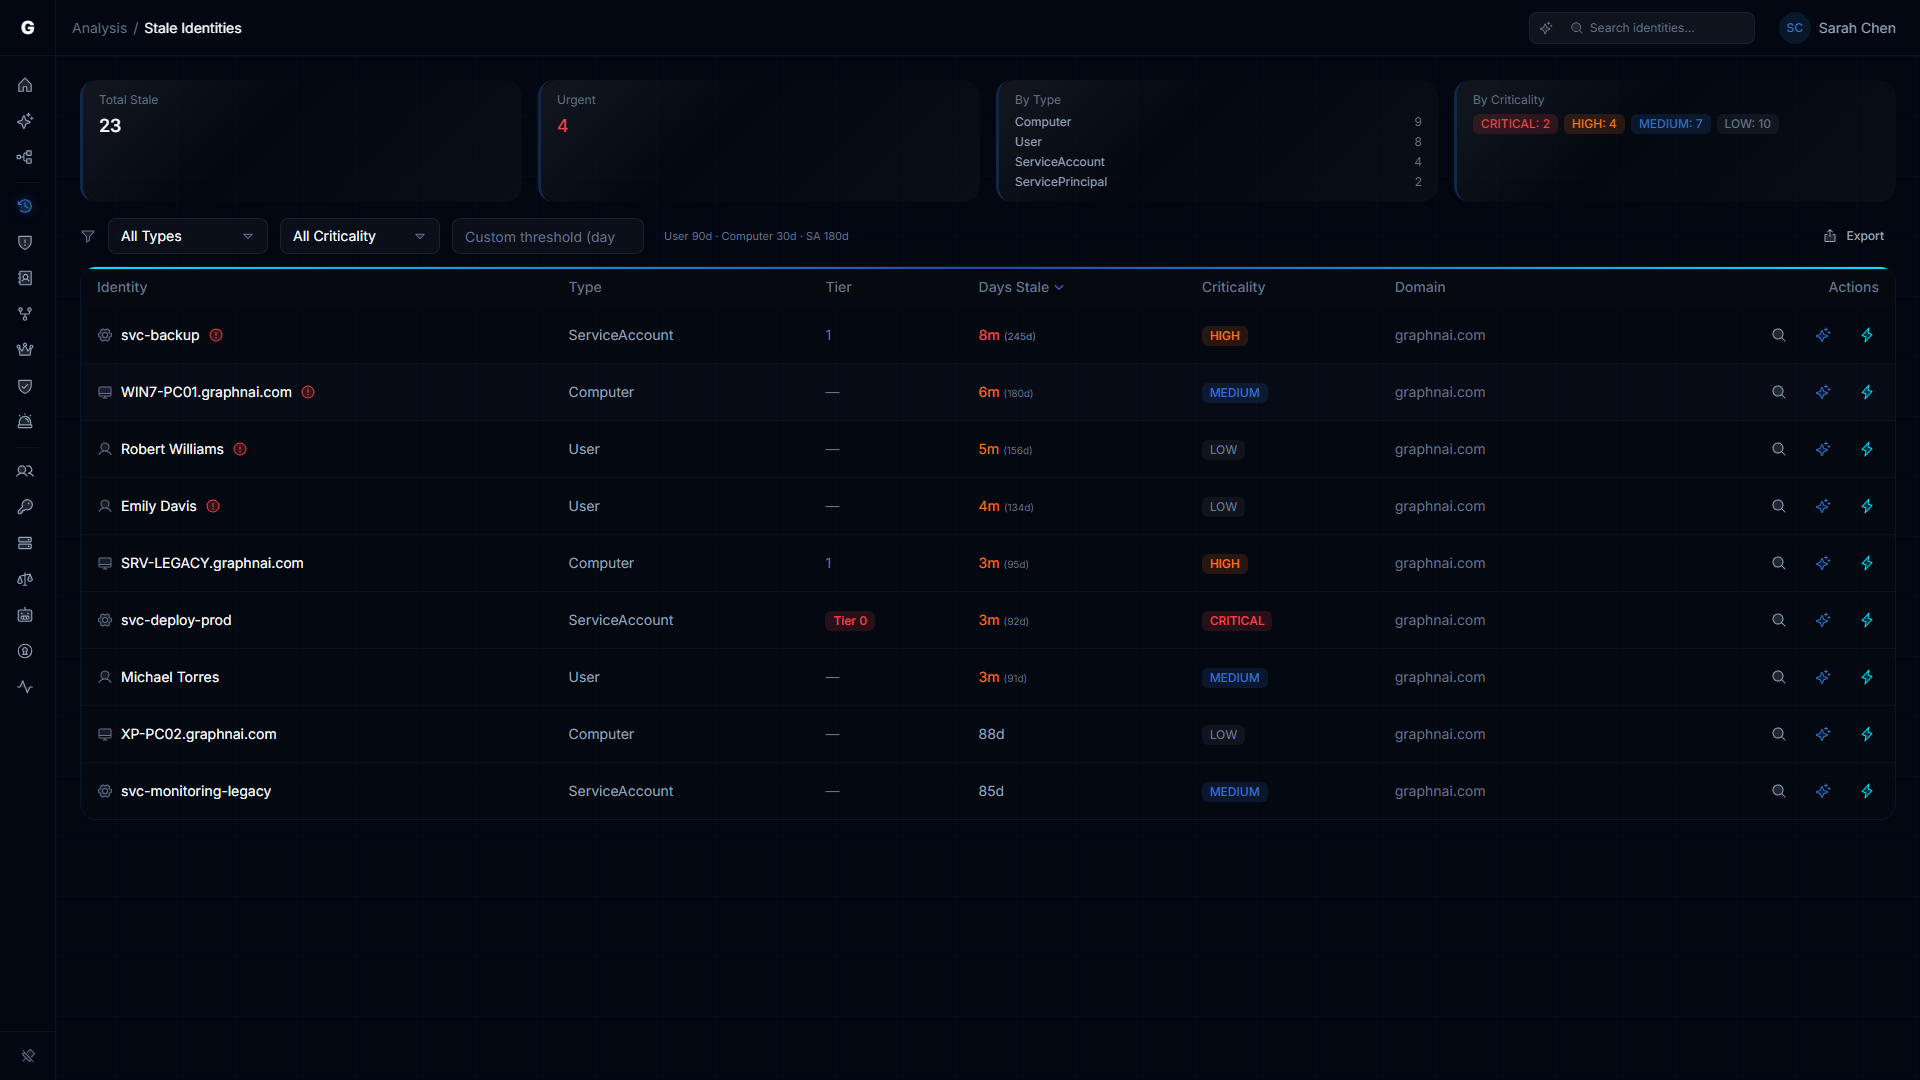
Understanding the Results
Summary Cards
At the top of the view, four summary cards provide an at-a-glance overview of your stale identity posture:
| Card | Description |
|---|---|
| Total Stale | The total number of identities exceeding their staleness threshold across all types |
| Urgent | Count of stale identities classified as urgent priority (Tier 0 assets, CRITICAL criticality) -- these require immediate attention |
| By Type | Breakdown showing how many stale identities exist per type, sorted by count (top 4 shown) |
| By Criticality | Breakdown showing how many stale identities fall into each criticality level, displayed as color-coded badges |
Findings Table
The table loads up to 1,000 stale identity findings with client-side sorting. Columns are sortable by clicking their headers -- click once for ascending, again for descending. The Days Stale and Criticality columns default to descending order (most stale / highest criticality first).
| Column | Description |
|---|---|
| Identity | The account's display name with a type icon. Urgent-priority findings show a warning icon. System accounts (Exchange health mailboxes, system mailboxes, discovery search mailboxes) are tagged with a "System" badge. |
| Type | The identity type (User, Computer, ServiceAccount, ServicePrincipal, Device) |
| Tier | The security tier classification. Tier 0 is displayed as a red badge; other tiers show their numeric value. |
| Days Stale | How long the identity has been inactive, displayed as a human-readable duration (e.g., "3 months") with the exact day count shown in parentheses for values over 90 days. Color-coded: red for 180+ days, orange for 90-180 days. |
| Criticality | The computed criticality level from the Asset Criticality Engine, displayed as a color-coded badge (CRITICAL, HIGH, MEDIUM, LOW) |
| Domain | The source domain or tenant for the identity |
System Account Filtering
Exchange and system mailbox accounts (HealthMailbox, SystemMailbox, DiscoverySearchMailbox, FederatedEmail) are included in the results but visually tagged with a "System" badge so you can identify them at a glance. These accounts are typically expected to be stale and can be filtered out by type when focusing on actionable findings.
Urgent Priority Flags
Rows marked with urgent priority show a warning icon next to the identity name. These represent:
- Tier 0 assets (Domain Admins, Enterprise Admins, etc.)
- CRITICAL criticality assets flagged by the Asset Criticality Engine
These stale identities should be reviewed and remediated immediately, as their compromise could grant an attacker administrative control over your environment.
Per-Row Actions
Each row includes action buttons on the right side:
| Button | Icon | Description |
|---|---|---|
| Investigate in Graph | Magnifying glass | Opens the identity in Graph Explorer for full neighborhood exploration |
| Explain with Graphne | Sparkle | Launches an AI-powered explanation of why this identity is flagged as stale, including risk context (visible when Graphne agent is available) |
| Select Fire | Lightning bolt | Opens the Select Fire workflow to remediate this stale identity (e.g., disable account, remove access). Available to Operator and Admin roles. |
CSV Export
Click the Export CSV button in the toolbar to download the current findings as a CSV file. The export includes all filtered and sorted results with the following columns: Identity, Type, Tier, Days Stale, Criticality, and Domain. The file is named with a graphnai-stale-identities prefix and the current date.
Filtering and Sorting Results
Type Filter
Use the Type dropdown to show only stale identities of a specific kind:
- All Types (default): Shows all stale identities
- User: Employee accounts, service accounts managed as users
- Computer: Domain-joined workstations and servers
- Service Account: Dedicated service accounts
- Service Principal: Cloud service principals (Azure AD apps, managed identities)
- Device: Mobile devices, IoT devices
Criticality Filter
Use the Criticality dropdown to set a minimum criticality threshold:
- All Criticality (default): Shows stale identities at any criticality level
- Critical+: Shows only CRITICAL identities
- High+: Shows CRITICAL and HIGH identities
- Medium+: Shows CRITICAL, HIGH, and MEDIUM identities (excludes LOW)
Domain Filter
When findings span multiple domains, a Domain dropdown appears in the toolbar. Use it to narrow results to a single domain or tenant. This filter only appears when two or more distinct domains are present in the results.
Tier URL Filter
When navigating from the Risk Posture Dashboard's Tier 0 Exposure card, the page loads with a ?tier=0 parameter that restricts results to that tier. A red "Tier 0 Only" badge appears above the filter bar. Click the x on the badge to remove the constraint and show all tiers.
Sort Order
Click any column header in the table to sort by that column. Click the same header again to toggle between ascending and descending order. The Days Stale and Criticality columns default to descending (most stale / highest criticality first); all other columns default to ascending.
The default sort is Days Stale descending, so the longest-inactive identities appear at the top.
Staleness Thresholds
GraphnAI uses different staleness thresholds for different identity types, reflecting their expected activity patterns:
| Identity Type | Default Threshold | Rationale |
|---|---|---|
| User | 90 days | Employees typically authenticate at least quarterly; longer absences suggest departure or disability |
| Computer | 30 days | Workstations and servers authenticate daily; a month of inactivity indicates decommissioning or permanent offline status |
| ServiceAccount | 180 days | Service accounts may legitimately remain idle for extended periods (e.g., quarterly batch jobs) |
| ServicePrincipal | 180 days | Cloud service principals often have infrequent authentication patterns |
| Device | 30 days | Mobile devices and IoT endpoints authenticate regularly when active |
| All Others | 90 days | Groups, roles, and applications default to the standard 90-day threshold |
The current threshold is displayed next to the threshold input: either "User 90d, Computer 30d, SA 180d" (defaults) or the custom value you entered.
Custom Threshold
To override these defaults for a specific analysis:
- Enter a number of days (1-3650) in the Custom threshold (days) field in the toolbar
- The query re-executes automatically after a short debounce delay (no Apply button needed)
- The custom threshold applies to all identity types for this session
To reset to default thresholds, clear the field.
TIP
Use custom thresholds during audits or investigations. For example, setting a 60-day threshold before a compliance review surfaces identities approaching the standard 90-day cutoff.
Interacting with Findings
Finding Detail Flyout
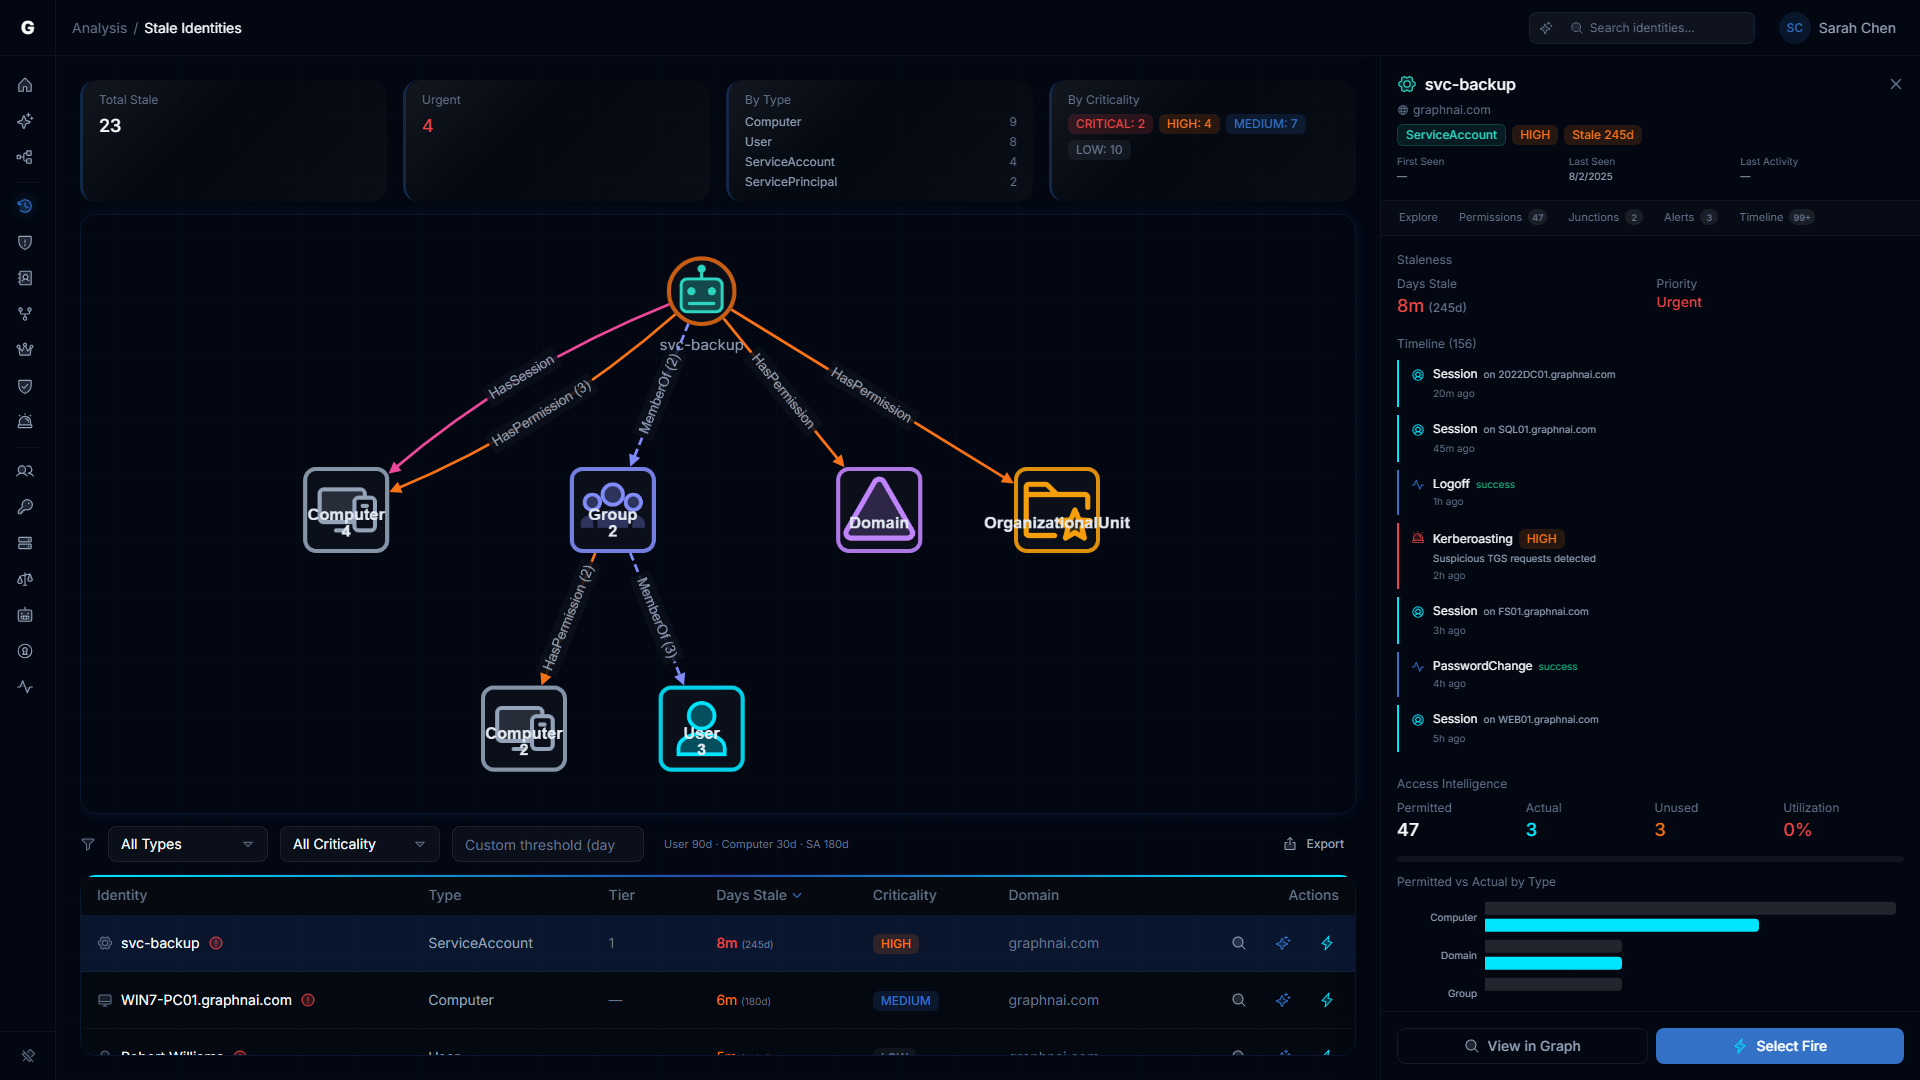
Clicking any row in the findings table opens a FindingDetailFlyout panel on the right side of the page. The page transitions to a split-pane layout:
- Top section: Summary cards (compressed)
- Middle section: A Blast Radius Graph showing the selected identity's access neighborhood -- the identities, resources, and permissions reachable from the stale account
- Bottom section: The findings table (compressed to a scrollable strip)
- Right panel: The detail flyout
The detail flyout shows:
- Identity header: Display name, type, criticality badge, tier, and domain
- Activity indicator: Last seen / last activity timestamp with staleness duration
- Investigation tabs (FlyoutNavigationTabs): Navigate to related analysis views for this identity without leaving context:
- Explore: Open in Graph Explorer
- Permissions: View in Over-Permission Analytics
- Membership: View group membership chain (for Users, Computers, Groups)
- Junctions: View critical junction analysis
- Exposure: View Tier 0 exposure paths (for Users)
- Alerts: View detection alerts
- Timeline: View identity event timeline inline
- Staleness section: Days stale (with color coding) and priority classification
- Identity Timeline: Recent authentication and activity events for this identity
- Access Intelligence: Summary of the identity's permission footprint and access paths, with links to navigate to related identities in Graph Explorer
Click another row to switch the flyout to a different identity. Click the same row again or the close button to dismiss the flyout and return to the full-width table view.
Blast Radius Graph
The blast radius visualization shows what an attacker could reach if they compromised the selected stale account. Tap on aggregate nodes in the graph to drill down into the grouped identities -- a drill-down panel replaces the main table, showing the individual members. Click any member to navigate to it in Graph Explorer.
Select Fire Remediation
From either the per-row lightning button or the flyout's Select Fire button, the Select Fire workflow opens with the stale identity pre-loaded as the subject and "remove access" as the default operation. This flows through the standard Select Fire phases: Preview, Simulate (with blast radius analysis), and Decision.
Use Cases
Quarterly Stale Account Audit
- Set Criticality to Medium+ or higher to exclude test accounts and low-value assets
- Sort by Days Stale (default descending)
- Work through the findings, clicking each row to inspect the blast radius and access intelligence
- For each stale account, decide whether to:
- Disable the account via Select Fire (recommended first step)
- Delete the account (after verification that no automated processes depend on it)
- Ignore (if the account is legitimately idle, e.g., a once-per-year batch process)
- Export the results to CSV for audit documentation
Tier 0 Hygiene Check
- Look at the Urgent summary card -- this should ideally be 0
- If it is non-zero, click each urgent finding to open the detail flyout and inspect the blast radius graph
- Use the investigation tabs to check the identity's permissions, group memberships, and Tier 0 exposure paths
- Stale Tier 0 accounts are the highest-priority finding in the entire platform, as they represent dormant administrative access
Pre-Audit Preparation
- Set a Custom Threshold to 60 days (tighter than the default 90-day standard)
- Click Export CSV to download the findings
- Share the CSV with department heads to confirm which accounts can be deprovisioned
Service Account Cleanup
- Set Type filter to Service Account
- Set Custom Threshold to 365 days (1 year)
- Review the findings, clicking each to inspect the blast radius and access intelligence
- For each stale service account, check whether it still has active permissions on production resources
- Use Select Fire to remediate accounts that should be disabled
Troubleshooting
"No stale identities found" but I know stale accounts exist
Possible causes:
- Recent sync: If a full sync just completed, all identity
LastSeentimestamps were updated to "now" - Threshold too high: The default thresholds may be too generous for your environment. Try a custom threshold (e.g., 30 days)
- Criticality filter: Check if you have a Criticality filter active that is excluding findings
- Type filter: Ensure you have not narrowed the Type filter to a category with no stale identities
- Tier filter: Check the URL for a
?tier=parameter from a dashboard click-through -- dismiss the tier badge to see all results
Solution: Reset all filters (set Type to "All Types", Criticality to "All Criticality", clear Custom Threshold, dismiss any tier badge) and check again.
Urgent count is very high (e.g., 50+ urgent stale accounts)
Possible causes:
- Incomplete criticality evaluation: The background worker may not have completed its first criticality evaluation pass yet
- Criticality rule misconfiguration: A custom criticality rule may be flagging too many accounts as Tier 0
Solution:
- Check the worker logs to confirm it has completed at least one evaluation cycle
- Review your criticality rules at Admin > Criticality in the sidebar to ensure Tier 0 classification is accurate
- If the Tier 0 accounts are legitimately stale, this represents a critical security finding and should be escalated immediately
Stale identity appears in results but is not actually stale
Possible causes:
- Sync timing: The identity may have authenticated recently but the bridge has not yet performed a delta sync to update its
LastSeentimestamp - Bridge configuration: The bridge may be performing full syncs only (no delta syncs), so
LastSeentimestamps update only once per day
Solution:
- Click the finding to open the detail flyout and check the activity indicator for the exact last seen timestamp
- Navigate to the Bridge detail page Sync History section to see when the last delta sync occurred
- Trigger a manual delta sync if needed: Trigger Sync > Delta Sync
Access denied when viewing Stale Identities
Cause: Your user account does not have the Operator role or higher.
Solution: Contact an Admin to grant you Operator or Admin role via Admin > User Management in the sidebar.
Best Practices
- Run stale identity audits quarterly as part of your access review cycle
- Prioritize Tier 0 stale accounts -- these should never exist in a healthy environment
- Use group-based thresholds -- Apply custom thresholds when auditing specific identity types (e.g., 14 days for Computers during a hardware refresh)
- Inspect blast radius before acting -- Always click a stale identity to review its access neighborhood and blast radius graph before disabling or deleting it
- Use Select Fire for remediation -- The Select Fire workflow provides simulation and blast radius analysis before executing changes
- Export findings for audit trails -- Use CSV export to document stale account reviews for compliance
- Document exceptions -- If a service account is legitimately idle (e.g., annual batch jobs), document this in your identity management system to avoid repeated flagging
Security Considerations
- Stale identities are attack vectors: An attacker who compromises a stale account inherits all of its permissions with minimal detection risk
- Tier 0 stale accounts are critical findings: A dormant Domain Admin account is as dangerous as an active one if compromised
- LastSeen accuracy depends on sync frequency: If bridges perform full syncs only once per day,
LastSeentimestamps have a 24-hour resolution - Deletion is permanent: Always disable accounts first and monitor for unintended breakage before deleting them
- System accounts may be expected stale: Exchange health mailboxes and system mailboxes are tagged in the UI -- verify whether they represent actual risk before remediating
Related Documentation
- User Management & RBAC -- Learn about Operator role permissions
- Entra ID Setup -- Configure cloud identity synchronization